
Convert WebM to MP3 with FFmpeg, VLC or Your Browser
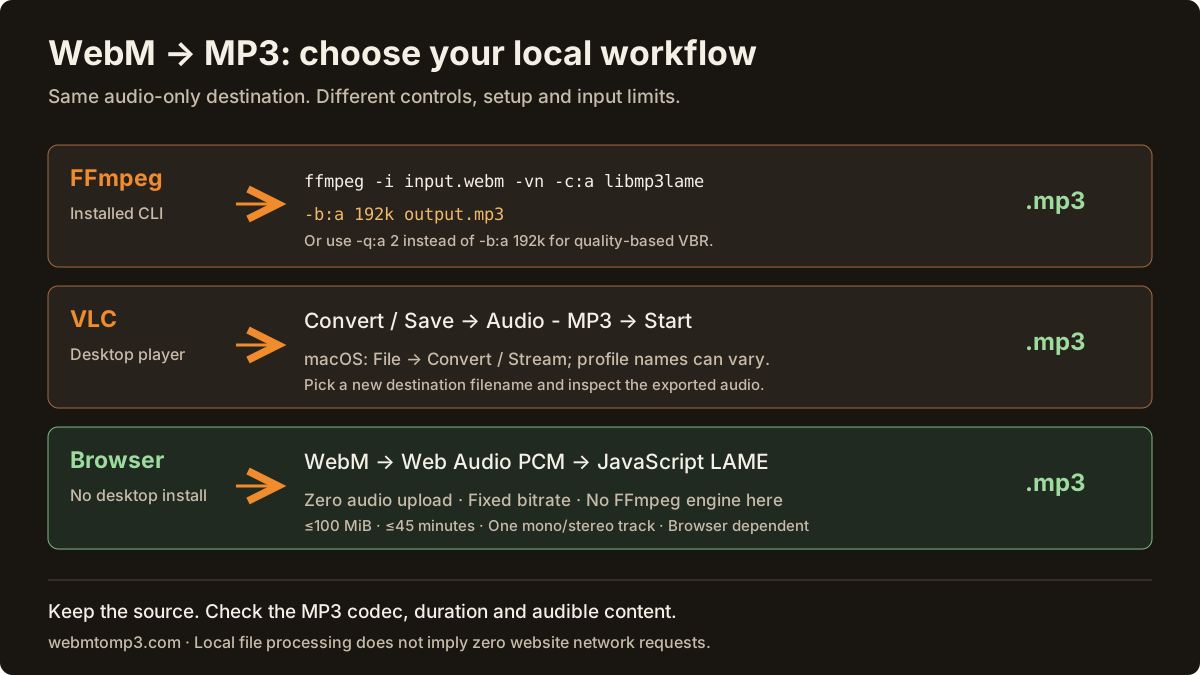
Use FFmpeg for repeatable command-line conversion, VLC for a desktop interface, or the local browser converter for a supported WebM recording. All three can process local files without uploading your audio to a conversion server; they have different installation and format constraints.
Convert WebM to MP3 with FFmpeg: the 192 kbps command
Install FFmpeg from a trusted source and confirm ffmpeg -version works. Your build must include the libmp3lame encoder. In a terminal opened in the input folder, run:
ffmpeg -i input.webm -vn -c:a libmp3lame -b:a 192k output.mp3- -i input.webm
- Reads the source container. Quote a path containing spaces, such as
"screen recording.webm". - -vn
- Excludes video from the output. The MP3 contains audio only, not a repaired copy of the original video.
- -c:a libmp3lame
- Decodes the selected audio and re-encodes it with the LAME MP3 encoder. It is not stream copying.
- -b:a 192k
- Targets 192 kilobits per second for fixed-bitrate output: about 1.44 MB per minute before small framing differences.
FFmpeg selects an audio stream automatically when no mapping is given. Add -map 0:a:0 after the input to select the first audio stream explicitly. Change it to -map 0:a:1 only when inspection confirms a second track. These commands leave the input unchanged and prompt before replacing an existing output.
Use -q:a 2 for variable-bitrate MP3 instead
ffmpeg -i input.webm -map 0:a:0 -vn -c:a libmp3lame -q:a 2 output-vbr.mp3-q:a 2 selects LAME quality-based VBR. Lower quality-scale numbers request higher quality; the resulting bitrate and file size depend on the audio. It is not a promise of exactly 192 or 320 kbps. Use this instead of -b:a 192k, not as a way to restore detail lost in Opus or Vorbis.
For a mono destination, add -ac 1 deliberately; it mixes channels and changes the signal. For most recordings, leave the sample rate alone rather than assuming -ar 48000 improves quality.
Convert WebM to MP3 with VLC Media Player
- On Windows or Linux, open VLC and choose Media → Convert / Save. Add the WebM file, then choose Convert / Save.
- Select the Audio - MP3 profile. If needed, edit its audio codec settings to MP3 and choose a bitrate such as 192 kbps. Disable video for an audio-only export.
- Choose a new destination ending in
.mp3, not the input filename, then select Start. Wait for processing to finish before opening the output. - On macOS, start from File → Convert / Stream, add the source, select or customize an MP3 audio profile, and save to a new file. Labels and encoder availability vary with VLC version and platform.
- Play the saved MP3 and verify its duration and content. An extension alone does not prove the correct output codec.
If the MP3 profile is unavailable or VLC cannot decode the file, inspect the source and use a suitable FFmpeg build. A video-only WebM has no audio for either tool to recover.
When to choose zero-upload browser conversion
| Method | Best fit | Important limit |
|---|---|---|
| FFmpeg | Explicit track selection, repeatable commands, CBR or VBR | Installed build with decoder and MP3 encoder |
| VLC | Desktop conversion without terminal commands | Profile and menu differences by platform |
| This browser tool | One supported WebM recording, no desktop installation | 100 MiB, 45 minutes, one mono/stereo audio track; decoder and memory dependent |
The browser tool offers fixed-bitrate MP3, not VBR, Ogg input or arbitrary stream selection. Local audio processing does not mean the website makes no network requests: assets and analytics are separate. Read the compatibility limits before using a long recording.
Check the output and troubleshoot common errors
ffprobe -v error -show_entries stream=codec_name,sample_rate,channels -show_entries format=duration,size -of json output.mp3Expect an MP3 audio stream and a plausible duration. Listen to the start, middle and end. “Unknown encoder” means your FFmpeg build lacks the requested encoder; “matches no streams” means the selected track does not exist. A truncated recording may fail decoding even if it plays partially.
For missing duration metadata, read the WebM duration guide. For standalone Opus files, see Opus to MP3; for track selection and no-sound recordings, see extract audio from WebM.
Frequently asked questions
- What is the FFmpeg command to convert WebM to MP3?
- Use ffmpeg -i input.webm -vn -c:a libmp3lame -b:a 192k output.mp3 with an FFmpeg build that includes libmp3lame. Add -map 0:a:0 to select the first audio stream explicitly.
- Should I use -b:a 192k or -q:a 2?
- Use -b:a 192k for fixed-bitrate MP3. Use -q:a 2 instead for LAME quality-based variable bitrate; its bitrate and file size depend on the source audio. Neither option restores detail lost in the original recording.
- How do I convert WebM to MP3 with VLC?
- On Windows or Linux, open Media, Convert / Save, add the file and select the Audio - MP3 profile. Choose a new .mp3 destination and start conversion. On macOS, use File, Convert / Stream. Menus and available profiles vary by version.
- Does this website run FFmpeg in the browser?
- No. This website uses browser Web Audio decoding and a JavaScript LAME encoder. The FFmpeg examples describe a separate desktop command-line workflow.
- Why is there no sound in the converted file?
- Check whether the source contains an audio track, whether that track contains sound and whether the correct track was selected. Converting a video-only or silent recording cannot create missing microphone or system audio.
Technical references: FFmpeg options, libmp3lame options, VLC transcoding documentation.